aptpod Advent Calendar 2023 12月12日を担当するintdashグループの呉羽です。
弊社が提供するintdashは、Webhook機能の実装を予定しています。Webhookとは、何らかのイベントの発生時、intdashのサーバーから指定のエンドポイントにHTTPリクエストを送信する機能です。この機能によってイベントを起点としたプログラムをHTTP通信で実行できるため、ポーリングやメッセージングシステムの利用は不要です。
そこで今回は、WebhookのHTTPリクエストを受け付けるアプリケーションをAWS上に実装し、実際に動作させるまでの手順をご紹介します。
アプリケーション例として、イベントを起点にデータをAmazon Lambda上で集計し、集計結果をAmazon SNSを通じてメール通知するものを作ります。アプリケーションのフローは以下のようになります。

これらの内、intdashが提供するのは2つのサービスです。
- Measurement_Service(計測データを保存するサービス)
- Webhook_Service(イベントに応じてHTTPリクエストを行うサービス)
intdashにおける計測とは、時系列データをまとめ、識別するためのリソースのようなものです。計測の作成時や終了時にイベントが発行され、それらをWebhookで通知します。今回のアプリケーションは計測の終了時に実行されることを想定します。
それでは、おおまかに以下のように開発を進めていきます。
- AWS SAMを使ったアプリケーションの構築
- Go言語を用いたアプリケーションの実装
- Webhookのテスト実行
1. AWS SAMを使ったアプリケーションの構築
AWS Serverless Application Model (以下、AWS SAM) は、AWS 上でサーバーレスアプリケーションをコマンドラインから構築できるツールです。以下のような手順で、お手軽に構築できます。
- AWS SAM CLIをインストールする
sam initコマンドでガイドに従いながらテンプレートを生成するsam build && sam deployコマンドでAWS上にデプロイする
それでは実際に試してみます。今回用いるAWS SAM CLIのバージョンは1.103.0です。
sam init コマンドによるテンプレート生成
sam initコマンドを実行するといくつかの質問がなされるので、以下のように回答します。
$ sam init

You can preselect a particular runtime or package type when using the `sam init` experience.
Call `sam init --help` to learn more.

Which template source would you like to use?
        1 - AWS Quick Start Templates
        2 - Custom Template Location
Choice: 1

Choose an AWS Quick Start application template
        1 - Hello World Example
        2 - Data processing
        3 - Hello World Example with Powertools for AWS Lambda
        4 - Multi-step workflow
        5 - Scheduled task
        6 - Standalone function
        7 - Serverless API
        8 - Infrastructure event management
        9 - Lambda Response Streaming
        10 - Serverless Connector Hello World Example
        11 - Multi-step workflow with Connectors
        12 - GraphQLApi Hello World Example
        13 - Full Stack
        14 - Lambda EFS example
        15 - Hello World Example With Powertools for AWS Lambda
        16 - DynamoDB Example
        17 - Machine Learning
Template: 1

Use the most popular runtime and package type? (Python and zip) [y/N]: N

Which runtime would you like to use?
        1 - aot.dotnet7 (provided.al2)
        2 - dotnet6
        3 - go1.x
        4 - go (provided.al2)
        5 - go (provided.al2023)
        6 - graalvm.java11 (provided.al2)
        7 - graalvm.java17 (provided.al2)
        8 - java21
        9 - java17
        10 - java11
        11 - java8.al2
        12 - java8
        13 - nodejs20.x
        14 - nodejs18.x
        15 - nodejs16.x
        16 - nodejs14.x
        17 - python3.9
        18 - python3.8
        19 - python3.7
        20 - python3.12
        21 - python3.11
        22 - python3.10
        23 - ruby3.2
        24 - ruby2.7
        25 - rust (provided.al2)
        26 - rust (provided.al2023)
Runtime: 3

What package type would you like to use?
        1 - Zip
        2 - Image
Package type: 1

...
すると以下のようなディレクトリが生成されます。
% tree sam-app
sam-app
├── Makefile
├── README.md
├── events
│   └── event.json
├── hello-world
│   ├── go.mod
│   ├── go.sum
│   ├── main.go
│   └── main_test.go
├── samconfig.toml
└── template.yaml
hello-world/main.goがLambdaで実行されるファイルとなります。
package main

import (
    "fmt"

    "github.com/aws/aws-lambda-go/events"
    "github.com/aws/aws-lambda-go/lambda"
)

func handler(request events.APIGatewayProxyRequest) (events.APIGatewayProxyResponse, error) {
    var greeting string
    sourceIP := request.RequestContext.Identity.SourceIP

    if sourceIP == "" {
        greeting = "Hello, world!\n"
    } else {
        greeting = fmt.Sprintf("Hello, %s!\n", sourceIP)
    }

    return events.APIGatewayProxyResponse{
        Body:       greeting,
        StatusCode: 200,
    }, nil
}

func main() {
    lambda.Start(handler)
}
sam deployでデプロイ
まずはそのままデプロイしてみましょう。sam build && sam deployコマンドを実行すると、AWS上にCloudFormationのスタックが1つ生成され、その中でAPI GatewayやLambda、IAM Roleなどが追加されています。
CloudFormation stack changeset
-----------------------------------------------------------------------------------------------------------------------------------------------------------------------------------------------------------------------------------------
Operation                                                  LogicalResourceId                                          ResourceType                                               Replacement
-----------------------------------------------------------------------------------------------------------------------------------------------------------------------------------------------------------------------------------------
+ Add                                                      ApplicationInsightsMonitoring                              AWS::ApplicationInsights::Application                      N/A
+ Add                                                      ApplicationResourceGroup                                   AWS::ResourceGroups::Group                                 N/A
+ Add                                                      HelloWorldFunctionCatchAllPermissionProd                   AWS::Lambda::Permission                                    N/A
+ Add                                                      HelloWorldFunctionRole                                     AWS::IAM::Role                                             N/A
+ Add                                                      HelloWorldFunction                                         AWS::Lambda::Function                                      N/A
+ Add                                                      ServerlessRestApiDeployment47fc2d5f9d                      AWS::ApiGateway::Deployment                                N/A
+ Add                                                      ServerlessRestApiProdStage                                 AWS::ApiGateway::Stage                                     N/A
+ Add                                                      ServerlessRestApi                                          AWS::ApiGateway::RestApi                                   N/A
-----------------------------------------------------------------------------------------------------------------------------------------------------------------------------------------------------------------------------------------
コマンド実行後、API Gatewayのエンドポイントが出力されます。このエンドポイントは後ほど利用します。
-------------------------------------------------------------------------------------------------------------------------------------------------------------------------------------------------------------------------------------------
Outputs
-------------------------------------------------------------------------------------------------------------------------------------------------------------------------------------------------------------------------------------------
Key                 HelloWorldAPI
Description         API Gateway endpoint URL for Prod environment for First Function
Value               https://xxx.execute-api.ap-northeast-1.amazonaws.com/Prod/hello/
Amazon SNSをCloudFormationに追加する
今回はメール通知を行うため、以下の対応が必要です。
- Amazon SNSのTopic・Subscriptionの作成
- LambdaのIAM Roleに、SNSのPublish権限を付与
AWS SAMでは、それらも簡単に行えます。sam initで生成されたtemplate.yamlがCloudFormationのテンプレートです。SNSのTopicとSubscriptionを追加するには、Resources配下に以下を追加します。
Resources:
  ReportingTopic:
    Type: AWS::SNS::Topic
  ReportingTopicSubscription:
    Type: AWS::SNS::Subscription
    Properties:
      Endpoint: your-address@example.com
      Protocol: email
      TopicArn: !Ref ReportingTopic
次にResources.HelloWorldFunction.Propertiesに以下のEnvironmentとPoliciesを追記します。
Resources:
  HelloWorldFunction:
    Properties:
      Environment:
        Variables:
          SNS_TOPIC_ARN: !GetAtt ReportingTopic.TopicArn
      Policies:
        - Version: "2012-10-17"
          Statement:
            - Effect: Allow
              Action:
                - sns:Publish
              Resource: !Ref ReportingTopic
EnvironmentにSNS TopicのARNを渡し、Lambda側でSNSに通知する際に利用します。またPoliciesで LambdaのIAM Roleに、SNSのPublish権限を付与しています。
そしてsam build && sam deploy --guidedコマンドを実行すると、AWS上にリソースが作成されます。Amazon SNSからメールを受け取るためにはメールの認証が必要のため、デプロイ後に届いた認証用リンクにアクセスしておきましょう。
2. Go言語を用いたアプリケーションの実装
アプリケーションの実装に入ります。以下の手順で実際のコード例と共に解説します。
- HTTPリクエストのBodyの検証
- データの取得と集計
- SNSへの通知
HTTPリクエストのBodyの検証
WebhookのHTTPリクエストがintdashから送信されたものであることを検証するために、x-intdash-signature-256Headerを利用します。このHeaderには、SHA-256アルゴリズムでHTTPリクエストのBodyをHash化した値が入っています。Hash化する際に秘密鍵を利用しており、この秘密鍵をお客様とintdash側で共有することで、第三者がHTTPリクエストを偽造できないようになっています。
以下はGo言語でHash値の検証を行う例です。Headerにはbase64でエンコードされた値が入っているため、デコードしてからハッシュ値を比較します。
func (h *Handler) validateSignature(ctx context.Context, request events.APIGatewayProxyRequest) error {
    const IntdashSignatureHeader = "x-intdash-signature-256"
    signature := request.Headers[IntdashSignatureHeader]
    if signature == "" {
        return fmt.Errorf("signature header %q is empty", IntdashSignatureHeader)
    }
    wantSum, err := base64.StdEncoding.DecodeString(signature)
    if err != nil {
        return fmt.Errorf("decode signature: %w", err)
    }

    hasher := hmac.New(sha256.New, h.SHA256Key)
    hasher.Write([]byte(request.Body))
    sum := hasher.Sum(nil)

    if !hmac.Equal(wantSum, sum) {
        return fmt.Errorf("signature mismatch, want %x, got %x", wantSum, sum)
    }
    return nil
}
検証完了後、Bodyをパースします。intdashのWebhookではJSONのresource_typeとactionプロパティに、「どのリソースで」「何のイベントがあったか」を格納します。
今回の例では以下のようにresource_typeにmeasurement、actionにfinishedが格納されています。
{"resource_type": "measurement", "action": "finished", "measurement_uuid": "xxxxxxx"}
またイベントの種類によってmeasurement_uuidのようなプロパティも追加で格納され、アプリケーションで利用できます。
データの取得と集計
簡略化のため、今回は実際にデータ取得をする代わりに「平均100、標準偏差15の正規分布から抽出した1000個の値を返す」実装をスタブとして利用します。
type IntdashAPIStub struct{}
func (s *IntdashAPIStub) FetchFloat64DataPoints(ctx context.Context, measurementUUID string) ([]float64, error) {
    r := rand.New(rand.NewSource(0))
    res := make([]float64, 1000)
    for i := range res {
        res[i] = r.NormFloat64()*15 + 100
    }
    return res, nil
}
あとはデータを集計し、メールの本文を生成します。今回は得られたデータの平均と不偏分散を集計して通知してみましょう。
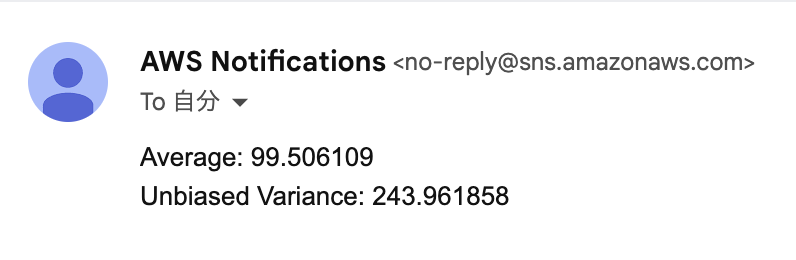
func (h *Handler) makeNotificationBody(dataPoints []float64) string {
    var sum float64
    for _, v := range dataPoints {
        sum += v
    }
    avg := sum / float64(len(dataPoints))

    var variance float64
    if len(dataPoints) > 1 {
        var dss float64 // deviation sum of squares
        for _, v := range dataPoints {
            dss += (v - avg) * (v - avg)
        }
        variance = dss / float64(len(dataPoints)-1)
    }

    return fmt.Sprintf("Average: %f\n"+"Unbiased Variance: %f\n", avg, variance)
}
最後にSNS Topicへ先ほど生成した本文をPublishすれば、メールが送信されます。
func (h *Handler) PublishSNS(ctx context.Context, body string) error {
    out, err := h.SNSPublishAPI.Publish(ctx, &sns.PublishInput{
        TopicArn: aws.String(h.SNSTopicArn),
        Message:  &body,
    })
    if err != nil {
        return fmt.Errorf("publish SNS: %w", err)
    }
    return nil
}
以上が大まかな実装方針です。実装後もsam build && sam deployコマンドを実行すれば、自動でAWS上のリソースを更新してくれます。
ここでは重要なコードのみを紹介しましたが、全体のコードを見たい場合はGitHubに公開しているaptpod/intdash-webhook-exampleをご参照下さい。
3. Webhookのテスト実行
それでは実際にWebhookの動作をテストしてみます。intdashでは以下のようにAPIを通じてWebhookを登録し、HTTPのエンドポイントと、x-intdash-signature-256Headerで利用する秘密鍵を指定します。
curl -X POST "https://intdash.example.com/api/hooks" \
    -H "Content-Type: application/json" \
    -d '{"url": "https://your-api-gateway-endpoint.example.com/hello/", "secret": "your-secret-here", "measurement_events": true}'
次にintdashのMeasurement_Serviceにデータをアップロードし、計測を終了します。今回はWebhookとそのアプリケーション実装法のご紹介が目的のため、intdashへの実際のアップロード手順は割愛しますが、おおまかには以下のような手順となります。
- 計測を作成する
- 計測にデータを送信する
- 計測を終了させる
計測の終了後、intdashのWebhook_ServiceがAPI GatewayにHTTPリクエストを送信します。しばらくするとSNSに登録したメールアドレスに集計結果が届きました。
これで一連の動作確認が出来ました。またintdashでは、以下のようにテスト実行用のAPIを叩くことで、実際のイベントが起きていなくとも架空のイベントが発行でき、テストが可能となっています。
curl -v -X PUT "https://intdash.example.com/api/hooks/:id/test" \
    -H "Content-Type: application/json" \
    -d '{"resource_type": "measurement", "action": "finished"}'
その他にもx-intdash-signature-256Headerと共に、手元から直接API Gatewayにリクエストして検証する方法もあります。
まとめ
WebhookのアプリケーションをAWSに実装し、intdashのWebhook機能を利用する例をご紹介しました。AWS SAMでは以下のような特徴があります。
- サーバーレスな構成となっているため、サーバーの費用は主にLambdaのみで安価に運用できる。
- アプリケーションを削除する場合は、CloudFormationのスタックの削除ボタンを押せば一括で削除できる。
- AWS SAM CLIによってローカルでもサーバーを立ち上げられる。
また今回はx-intdash-signature-256HeaderによってHTTPリクエストを検証しましたが、API Gatewayに認証をかける事も可能です。
このようなWebhookを利用したアプリケーションの構築はAWS SAMで手軽に構築できます。ぜひ利用してみてはいかがでしょうか。