intdashグループの落合です。普段はIoTデバイス側の製品開発を担当しています。
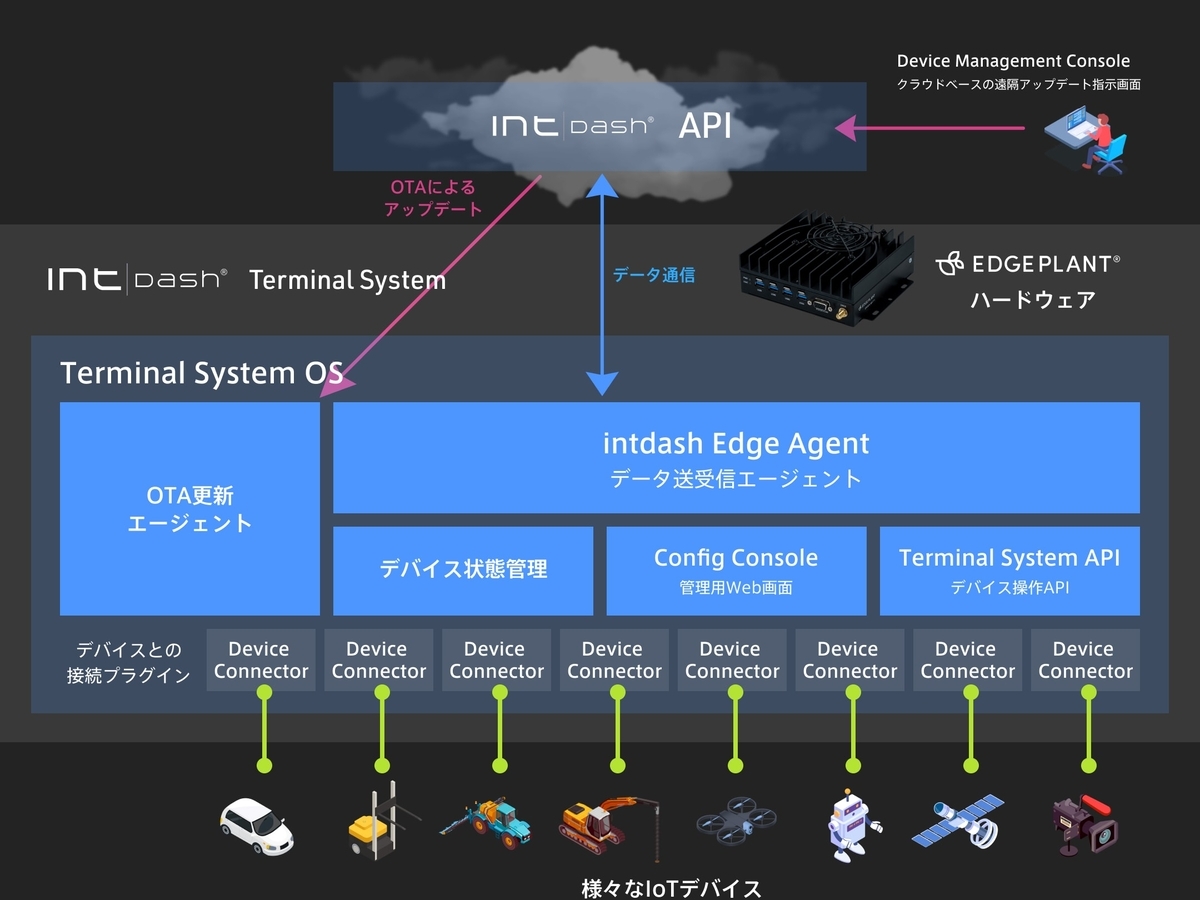
弊社がアプライアンス製品として提供しているゲートウェイデバイスには、独自のLinuxディストリビューションであるintdash Terminal System[1](以降、Terminal System OSと呼びます)が搭載されており、Menderを利用したOTAアップデート機能を備えています。
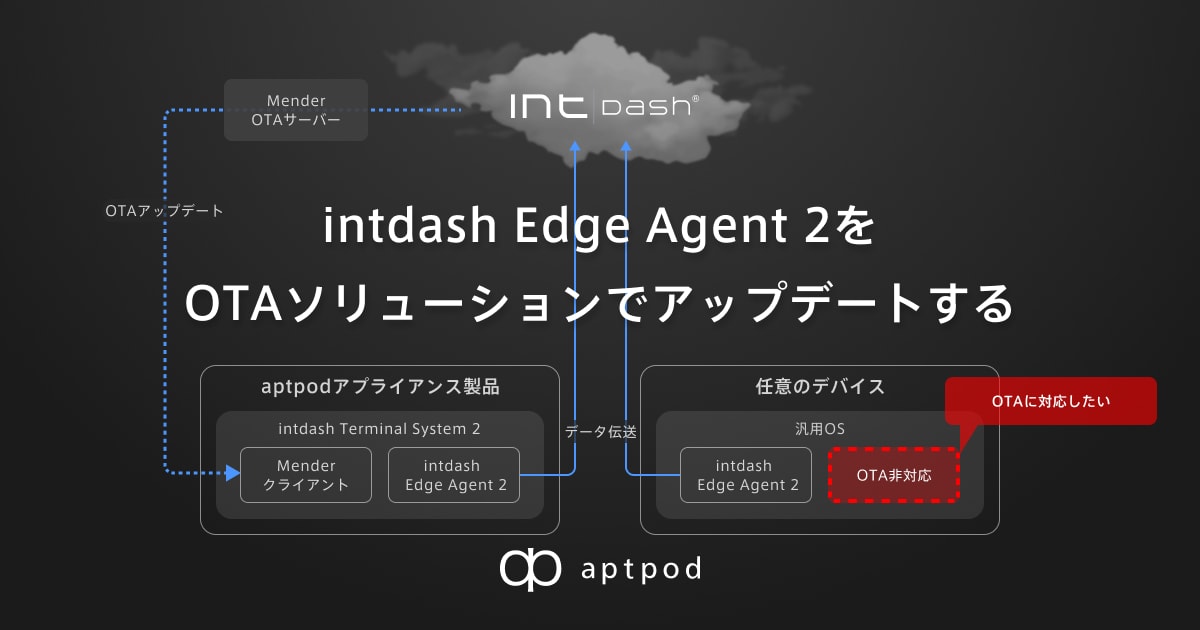
一方、お客様からintdash Edge Agent 2[2]を個別インストールした場合でも同じようにOTAアップデートを行いたいという要望をいただくことがあります。
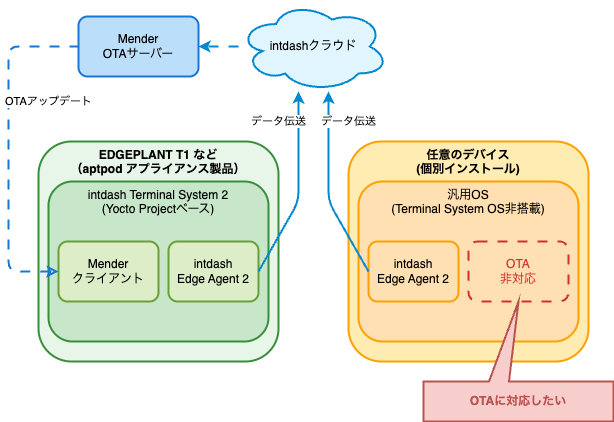
本記事では、個別インストールしたintdash Edge Agent 2をアップデートするために使えるOTAソリューションを選定し、どのようにリモートからアップデートできるか、実際の実装例も含めて解説していきます。
- 組み込みデバイスのOTAソリューション比較
- intdash Edge Agent 2 の OTAに適したソリューション選定
- OTAアップデート機能の実現方法
- 準備: Raspberry Pi に intdash Edge Agent 2をインストールする
- 実装例:AWS IoT Device Management 編
- 実装例:Mender 編
- まとめ
- 付録:AWS IoT Device Management編
- 付録:Mender編
組み込みデバイスのOTAソリューション比較
OTAソリューションには、OSレベルでのアップデートが可能なものと、OS上のミドルウェア/ソフトウェアのアップデートのみが可能なものがあります。
|
ソリューション |
OSアップデート |
ソフトウェアアップデート |
ライセンス/コスト |
|---|---|---|---|
|
△ ※ FreeRTOSがインストールされたデバイスのみが対象 |
○ ※ 所定のソフトウェア(AWS IoT SDK)がインストールされたデバイス |
従量課金制 |
|
|
○ ※ Yocto Project等で必要要件を満たしてビルドされたLinux OSが対象 |
○ ※ 所定のソフトウェア(mender-client)がインストールされたデバイス |
商用版:有償 |
|
|
○ ※ Yocto Project等で必要要件を満たしてビルドされたLinux OSが対象 |
△ ※ Yocto Project等でビルドされたLinux OS上であれば可能 |
オープンソース:無償 |
|
|
○ ※ Yocto Project等で必要要件を満たしてビルドされたLinux OSが対象 |
△ ※ Yocto Project等でビルドされたLinux OS上であれば可能 |
オープンソース:無償 |
|
|
× |
△ ※ BalenaOSがインストールされたデバイスが対象 |
商用版:有償 |
比較表を見ると、ソフトウェアアップデートする場合については、RAUC や SWUpdate、Balena のように専用のOSを必要とするものと、AWS IoT Device Management や Mender のように、クライアントソフトウェアをインストールすればよいだけのものとに分かれることが分かります。
ちなみに、前述の Terminal System OS の場合は、Yocto Project によるカーネルレベルでのカスタマイズを行っていたことと、コンテナ技術によるアプリケーションのデプロイにも対応させたかったことからMenderでのOSアップデートを採用しています。以下の記事にて詳しく解説されていますので、よろしければご覧ください。
intdash Edge Agent 2 の OTAに適したソリューション選定
intdash Edge Agent 2を個別にインストールする場合、既存のOSに追加でインストールするケースがほとんどです。
このため、選定基準として次の点を重視しました:
- 既存OSに手を加えずに導入できること
- クライアントソフトウェアのインストールのみで利用できること
これらの基準から、AWS IoT Device ManagementとMenderが候補として残りました。どちらも既存OSに必要なソフトウェアをインストールするだけで、アップデートが実現可能です。
以降では、この2つのソリューションについて、実現方法を検討していきます。
OTAアップデート機能の実現方法
intdash Edge Agent 2は、専用の公開リポジトリを登録することで、aptコマンドによってインストール・アップデートをすることができます。よって、OTAアップデートの際にも、OTAソリューションによって apt コマンドを実行することさえできれば、実際のアップデート自体は aptコマンドがよしなにやってくれることになります。
OTAソリューションとaptコマンドの役割分担を整理すると、以下のようになります。
|
ソリューション / プログラム |
役割 |
|---|---|
|
OTAソリューション |
遠隔からのユーザーの指示に従いaptコマンドを実行 |
|
Apt |
リポジトリからパッケージをダウンロードしてアップデート |
AWS IoT Device ManagementではJob機能を使用して、Menderではアプリケーションアップデート機能を使用して、それぞれリモートからコマンドを実行できます。
準備: Raspberry Pi に intdash Edge Agent 2をインストールする
今回はRaspberry Pi 4B に Ubuntu 22.04 LTS(Raspberry Pi Generic preinstalled server image)をインストールしたデバイスを用いて、AWS IoT Device Management と Mender における具体的なOTAアップデートの実現方法を確認していきます。
intdash Edge Agent 2をaptコマンドでインストールするには、公開リポジトリの登録が必要です。登録した後に古いバージョンの intdash Edge Agent 2もバージョン指定でインストールしておきます。
$ sudo apt-get update
$ sudo apt-get install -y \
    apt-transport-https \
    ca-certificates \
    curl \
    gnupg-agent
$ sudo mkdir -p /etc/apt/keyrings
$ curl -fsSL https://repository.aptpod.jp/intdash-edge/linux/ubuntu/gpg | \
    sudo gpg --dearmor -o /etc/apt/keyrings/intdash-edge.gpg
$ echo "deb [arch=$(dpkg --print-architecture) signed-by=/etc/apt/keyrings/intdash-edge.gpg] \
    https://repository.aptpod.jp/intdash-edge/linux/ubuntu \
    jammy \
    stable" \
    | sudo tee /etc/apt/sources.list.d/intdash-edge.list
$ sudo apt-get update
$ sudo apt-get install --no-install-recommends -y intdash-edge-agent2=1.2.0
インストールされている、バージョンも確認しておきます。
$ apt list -a --installed intdash-edge-agent2
Listing... Done
intdash-edge-agent2/unknown 1.3.0 arm64 [upgradable from: 1.2.0]
intdash-edge-agent2/unknown 1.2.3 arm64
intdash-edge-agent2/unknown 1.2.1 arm64
intdash-edge-agent2/unknown,now 1.2.0 arm64 [installed,upgradable to: 1.3.0]
intdash-edge-agent2/unknown 1.1.5 arm64
intdash-edge-agent2/unknown 1.1.4 arm64
intdash-edge-agent2/unknown 1.1.2 arm64
intdash-edge-agent2/unknown 1.1.1 arm64
intdash-edge-agent2/unknown 1.1.0 arm64
intdash-edge-agent2/unknown 1.0.9 arm64
intdash-edge-agent2/unknown 1.0.8 arm64
intdash-edge-agent2/unknown 1.0.7 arm64
intdash-edge-agent2/unknown 1.0.6 arm64
intdash-edge-agent2/unknown 1.0.5 arm64
intdash-edge-agent2/unknown 1.0.4 arm64
intdash-edge-agent2/unknown 1.0.3 arm64
インストールされたバージョンは1.2.0になっていて、最新のアップデートは1.3.0、1.2.0に対するパッチアップデートでは1.2.3が存在することが分かります。
ちなみに、以下のように設定をしておくことで、インストールされるバージョンを固定することができます。
$ cat << EOF | sudo tee /etc/apt/preferences.d/intdash-edge-agent2.pref
Package: intdash-edge-agent2
Pin: version 1.2.*
Pin-Priority: 999
EOF
この設定ファイルでは、インストールされるバージョンを 1.2.x系のパッチバージョンに限定しています。
実装例:AWS IoT Device Management 編
今回やりたいことに適したドキュメントがこちらにあるので、これを参考にしました。概要をまとめると以下のようになります。
ステップ1: Thing の作成とAWS IoT Device Client の設定
ステップ1に関しては、本編上に記載すると煩雑になりすぎるため、巻末に付録として添付しました。詳細な手順を知りたい方は、リンク先の巻末を御覧ください。
ステップ2 : AWS IoT Job の作成と送信
③ OTAアップデート用のJobの作成
AWS IoT Jobを作成することで、アップデートを行いましょう。
準備編でAptの設定が事前に完了しているため、以下のコマンドを実行すると、「特定のマイナーバージョンに対してパッチバージョンの更新のみ行う」作業が実行されます。
$ apt-get install -y intdash-edge-agent2
このため、アップデートをするには、テンプレートのAWS-Install-Applicationを使用すれば問題ありません。
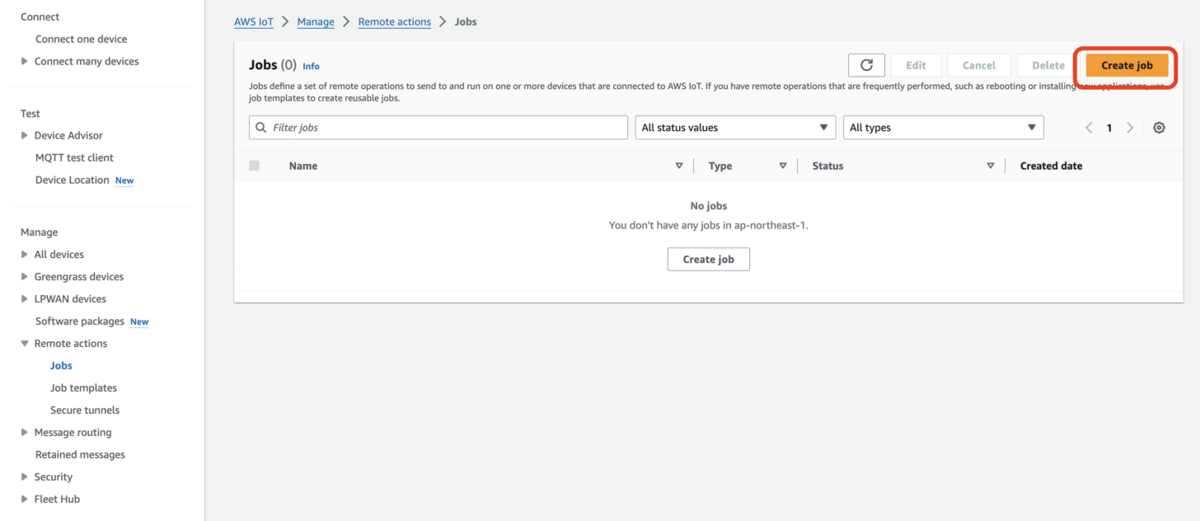
AWS IoT CoreのコンソールでJobを作成する手順は以下の通りです。
左側メニューからManage > Remote actions > Jobsを選択し、Create jobをクリックします。
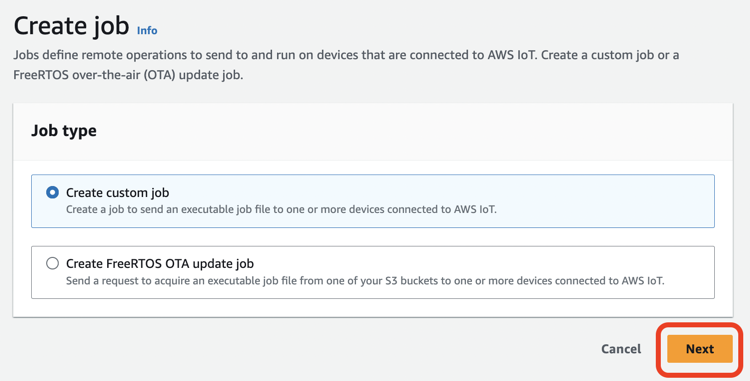
Create custom jobを選択し、Nextをクリックします。
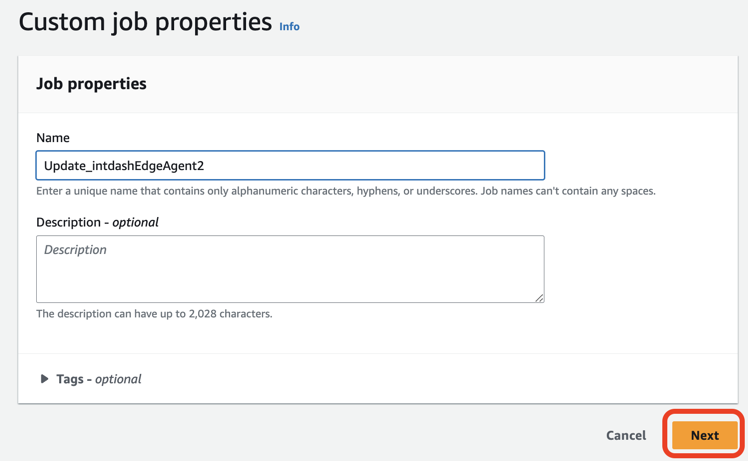
Nameに名前(ここではUpdate_intdashEdgeAgent2)を入力し、Nextをクリックします。
Things to run this jobに対象のThing(ここではUpdateTestPilot)を選択し、Job documentはFrom templateを選択し、Template typeにAWS managed templatesを選択し、TemplateにAWS-Install-Applicationを選択し、packagesにアップデートするパッケージ名(ここではintdash-edge-agent2)を入力し、runAsUserにrootを入力し、Nextをクリックします。

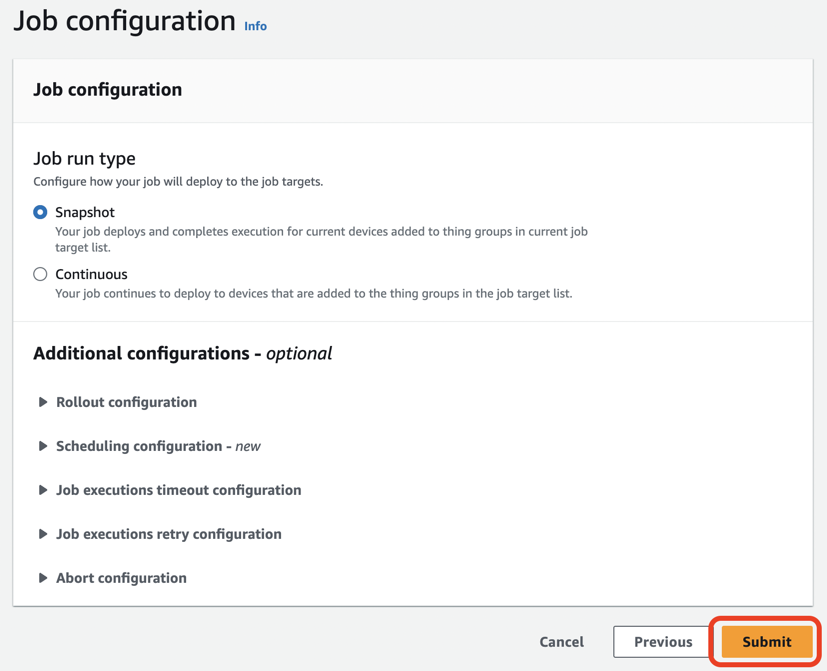
Job run typeにSnapshotを選択し、Submitをクリックします。
Jobが完了するまで待ちます。
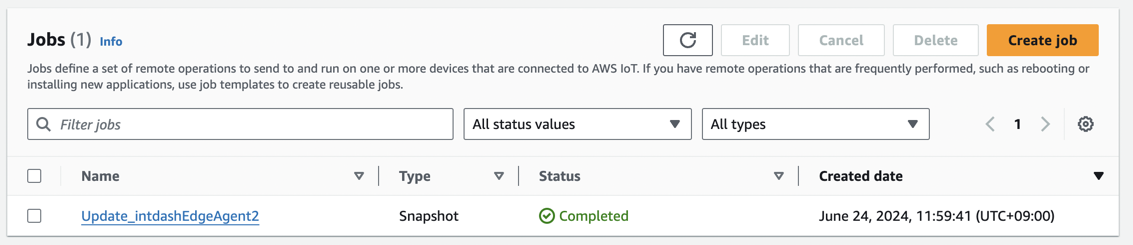
完了したので、Raspberry Pi 側でログを確認してみます。
$ journalctl -u aws-iot-device-client -f
Jun 24 03:01:07 update-test-pilot aws-iot-device-client[7133]: 2024-06-24T03:01:07.772Z [ERROR] {8435}: debconf: falling back to frontend: Readline
Jun 24 03:01:07 update-test-pilot aws-iot-device-client[7133]: 2024-06-24T03:01:07.772Z [ERROR] {8435}: debconf: unable to initialize frontend: Readline
Jun 24 03:01:07 update-test-pilot aws-iot-device-client[7133]: 2024-06-24T03:01:07.772Z [ERROR] {8435}: debconf: (This frontend requires a controlling tty.)
Jun 24 03:01:07 update-test-pilot aws-iot-device-client[7133]: 2024-06-24T03:01:07.772Z [ERROR] {8435}: debconf: falling back to frontend: Teletype
Jun 24 03:01:07 update-test-pilot aws-iot-device-client[7133]: 2024-06-24T03:01:07.772Z [ERROR] {8435}: dpkg-preconfigure: unable to re-open stdin:
Jun 24 03:01:07 update-test-pilot aws-iot-device-client[7133]: 2024-06-24T03:01:07.772Z [WARN]  {JobEngine.cpp}: While executing action Install-Application, JobEngine reported receiving errors from STDERR
Jun 24 03:01:07 update-test-pilot aws-iot-device-client[7133]: 2024-06-24T03:01:07.772Z [INFO]  {JobsFeature.cpp}: Job exited with status: 0
Jun 24 03:01:07 update-test-pilot aws-iot-device-client[7133]: 2024-06-24T03:01:07.772Z [WARN]  {JobsFeature.cpp}: JobEngine reported receiving errors from STDERR
Jun 24 03:01:07 update-test-pilot aws-iot-device-client[7133]: 2024-06-24T03:01:07.772Z [INFO]  {JobsFeature.cpp}: Job executed successfully!
Jun 24 03:01:08 update-test-pilot aws-iot-device-client[7133]: 2024-06-24T03:01:08.195Z [INFO]  {JobsFeature.cpp}: No pending jobs are scheduled, waiting for the next incoming job
Install-Applicationが status: 0 で終了しているため、成功したようです。
現在のパッケージバージョンを確認してみます。
$ apt list --installed intdash-edge-agent2
Listing... Done
intdash-edge-agent2/unknown,now 1.2.3 arm64 [installed]
N: There are 14 additional versions. Please use the '-a' switch to see them.
✅ 期待通りに、マイナーバージョンは変わらずに、パッチバージョンの更新がされました!
実装例:Mender 編
Menderを使用して、アプリケーションのアップデートを行う方法は、こちらに記載されているように、Mender Clientがインストールされたイメージを使用することもできますが、本記事の趣旨に沿って、今回は準備編で構築済みのRaspberry Piに対して、追加でmender-clientをインストールしてみます。
手順をまとめると以下のようになります。
ステップ1: Hosted Menderアカウントの作成と mender-client のインストール
ステップ1に関しては、本編上に記載すると煩雑になりすぎるため、巻末に付録として添付しました。詳細な手順を知りたい方は、リンク先の巻末を御覧ください。
ステップ2 : Mender Artifact の作成とデプロイ
④ Mender Artifactの作成と登録
アプリケーションアップデートのために必要なMender Artifactの作成をして、アップデートを行なってみましょう。
準備編でAptの設定が事前に完了しているため、以下のコマンドを実行すると、「特定のマイナーバージョンに対してパッチバージョンの更新のみ行う」作業が実行されます。
$ apt-get install -y intdash-edge-agent2
このため、上記コマンドを実行するMender Artifactを作成すれば問題ありません。
Mender Artifactは、ファイルフォーマットに準拠して作成する必要があります。ただし、今回はスクリプトを実行するだけなので、mender-clientのインストールによって使用できるようになるscriptアップデートモジュールを利用することで簡単に作ることができます。
作成に必要なmender-artifactツールはdockerイメージが提供されているため、そちらを使用して以下のコマンドで作成します。
まず、アップデートを行うコマンドを実行するスクリプトを記載します。
$ cat > update-script.sh << EOF
#!/bin/bash
apt-get install -y intdash-edge-agent2
EOF
次にdockerでmender-artifactを実行します。
$ docker run -v $(pwd):/work -w /work \
--rm mendersoftware/mender-ci-tools:1.0.0 \
mender-artifact write module-image -T script \
  -n intdash-edge-agent2-update-1.0 \
  -t raspberrypi4 \
  -o intdash-edge-agent2-update-1.0.mender \
  -f update-script.sh
ホストのカレントディレクトリにintdash-edge-agent2-update-1.0.menderというファイルが出来上がっているので、これでMender Artifactは完成です。
次にintdash-edge-agent2-update-1.0.menderをhosted Menderに登録します。手順は以下の通りです。
hosted Menderにログインし、RELEASESをクリックし、UPLOADをクリックします。
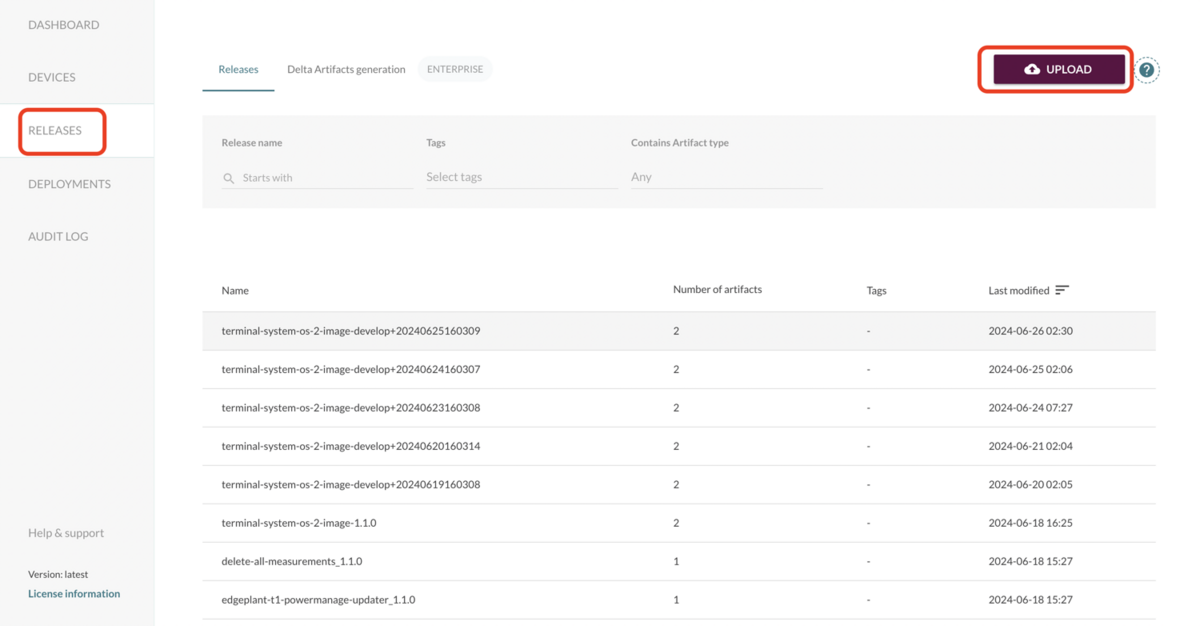
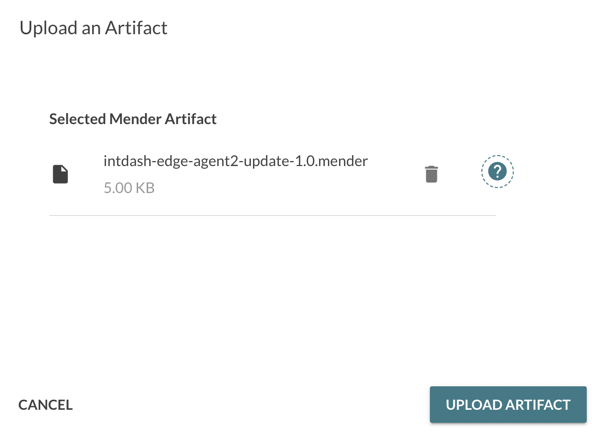
アップロードするファイルintdash-edge-agent2-update-1.0.menderのファイルを選択します。

UPLOAD ARTIFACTをクリックします。
⑤ アプリケーションアップデート
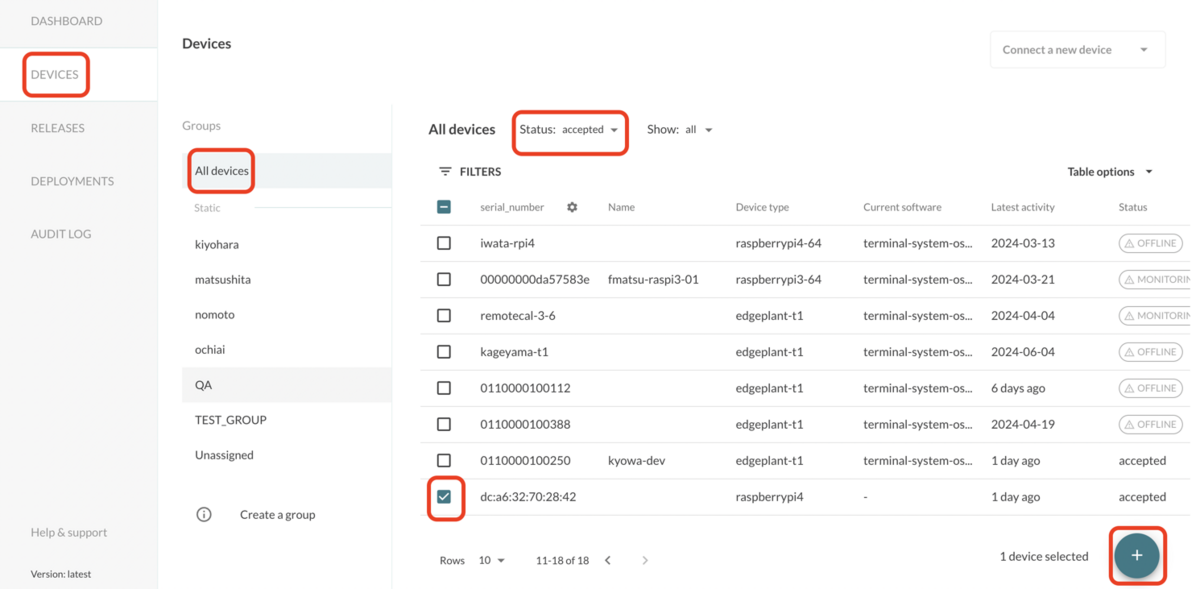
作成したMender ArtifactをRaspberry Piにデプロイしてアップデートをしてみます。手順は以下の通りです。
hosted Menderにログインし、DEVICES > All devicesをクリックし、Status: acceptedで認証済みのデバイスをフィルターします。対象のデバイスにチェックを入れ、右下の+ボタンをクリックします。

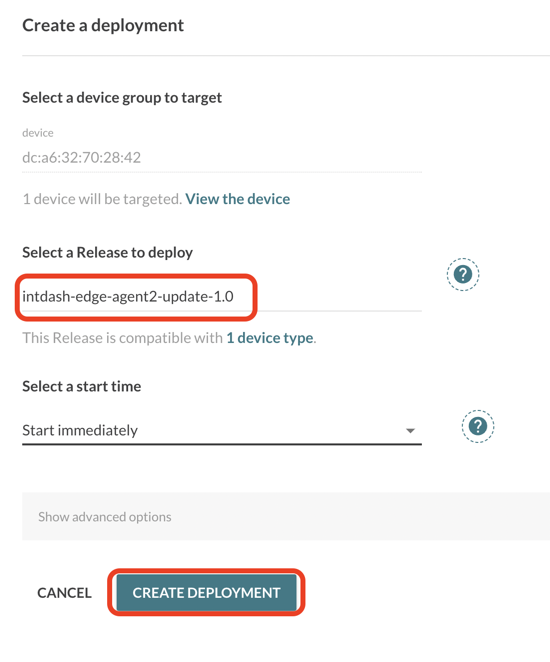
表示されたメニュからCreate deployment for this deviceをクリックします。
Select a Release to deployにintdash-edge-agent2-update-1.0を選択し、CREATE DEPLOYMENTをクリックします。
deploymentが完了するまで待ちます。
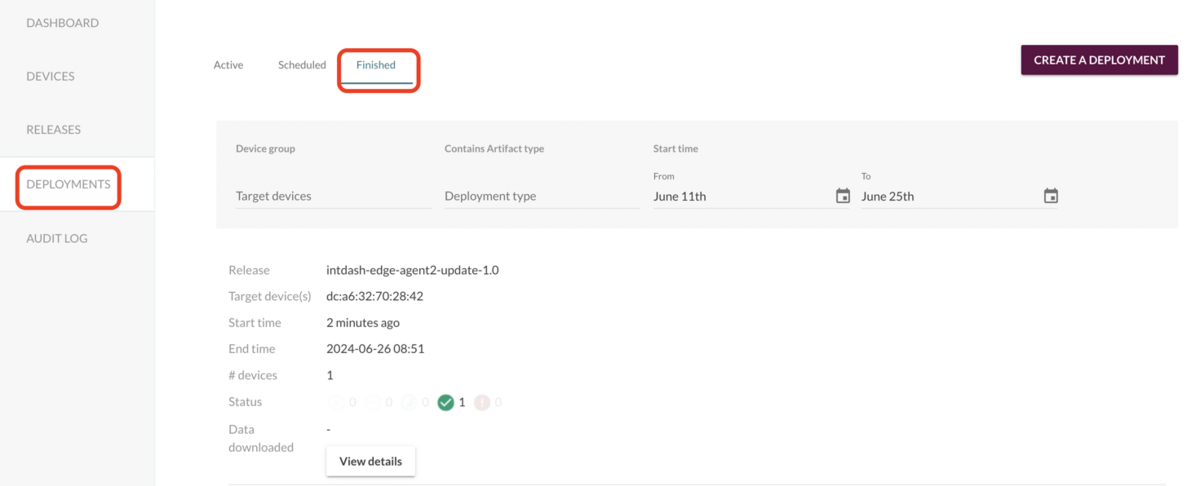
deploymentが完了すると、DEPLOYMENTS > Finishedの中にリストされます。
成功しているようです。
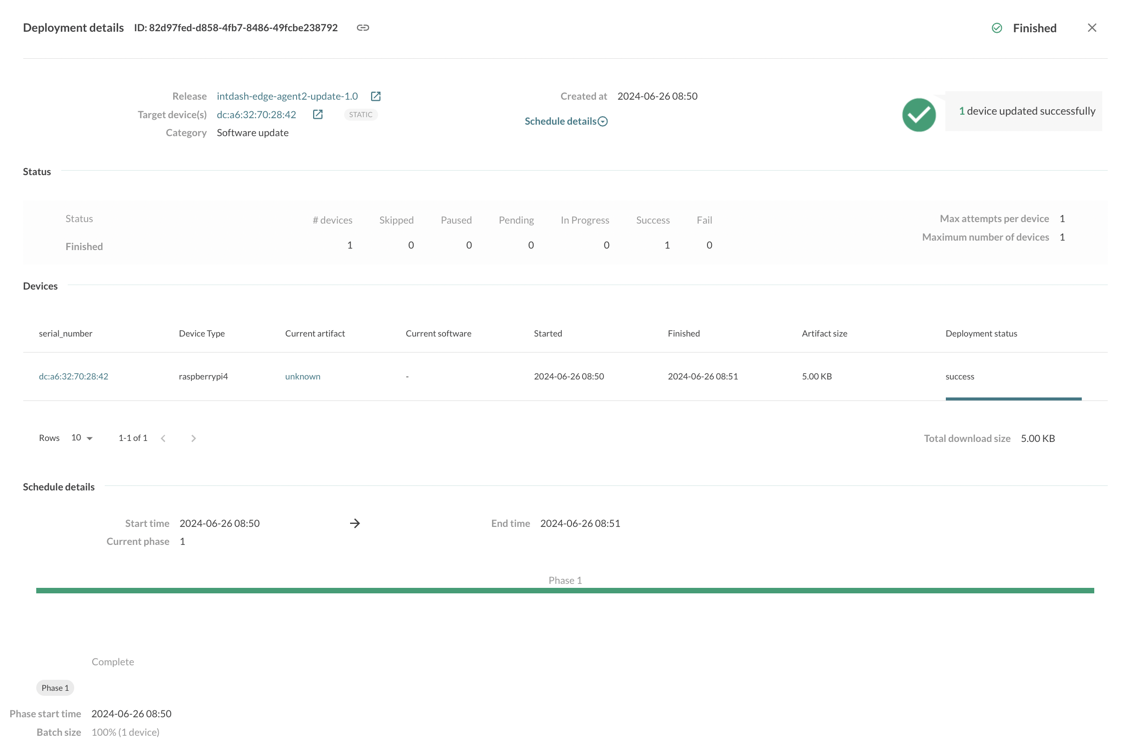
詳細を確認すると以下のようになっています。
Raspberry Piにログインして、現在のパッケージバージョンを確認してみます。
$ apt list --installed intdash-edge-agent2
Listing... Done
intdash-edge-agent2/unknown,now 1.2.3 arm64 [installed]
N: There are 14 additional versions. Please use the '-a' switch to see them.
✅ 期待通りに、マイナーバージョンは変わらずに、パッチバージョンの更新がされました!
まとめ
OTAソリューションとして使える、AWS IoT Device Management、Mender、RAUC、SWUpdate、Balenaを比較し、シンプルなOTAアップデートのシナリオをAWS IoT Device ManagementとMenderで試してみました。
今回のようにソフトウェアアップデートだけを考えると、AWS IoT Device ManagementはJobのテンプレートが準備されているため、学習コストや手間が少なと導入しやすかったです。ですが、将来的にOSのアップデートも視野に入れるのであればMenderを選択するケースもあると思います。
OTAアップデートを検討中の方にとって、この記事が参考になったら幸いです!
付録:AWS IoT Device Management編
ステップ1: Thing の作成と AWS IoT Device Client の設定
① AWS IoT CoreでThingを作成する
⚠️ 「② AWS IoT Device Clientのインストール」の作業にあるビルドが約20分かかります。まずはそちらを先に進めていただいてから、この作業をする方が効率的かもしれません。
AWSマネジメントコンソールからIoT Coreを開きます。
左側メニューからManage > All devices > Thingsを選びCreate thingsをクリックします。

Create Single Thingを選びNextをクリックします。

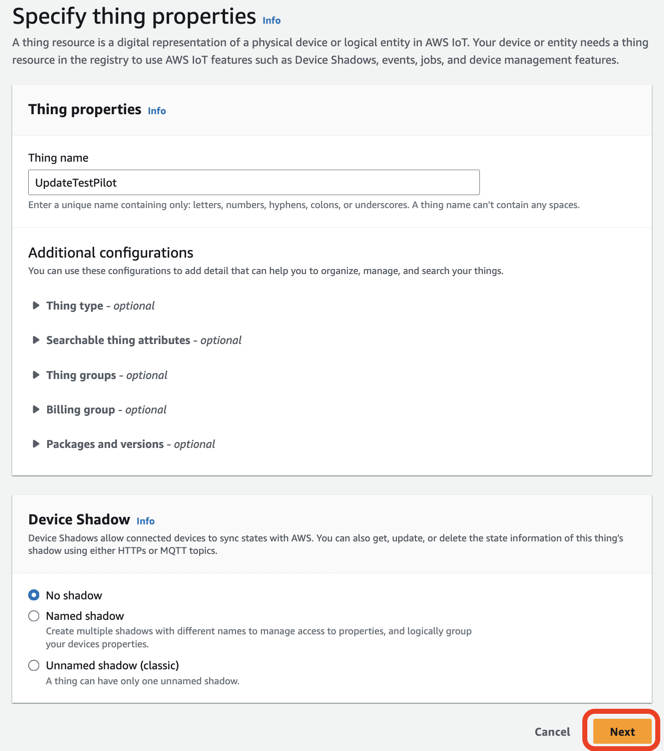
Thing nameに名前(ここではUpdateTestPilot)を入力しNextをクリックします。
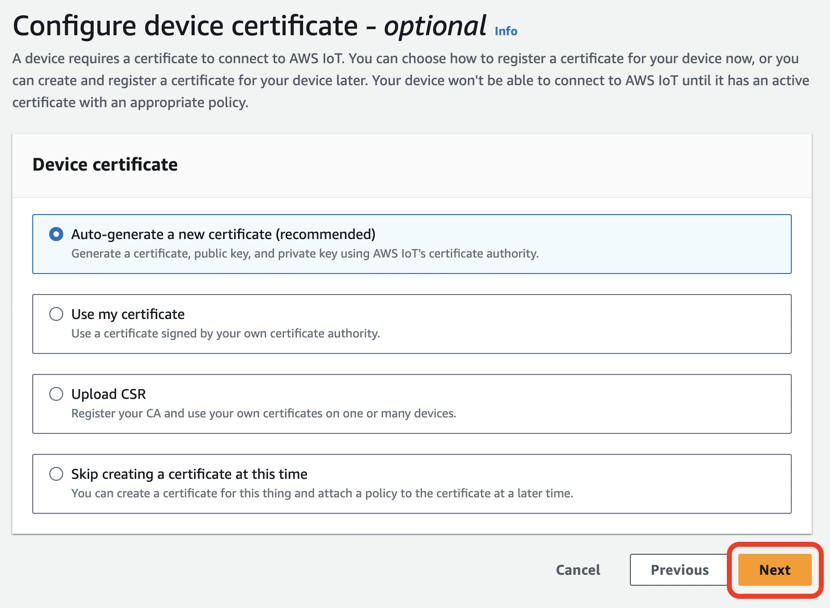
Auto-generate a new certificate (recommended)を選択しNextをクリックします。
Create plicyをクリックします。
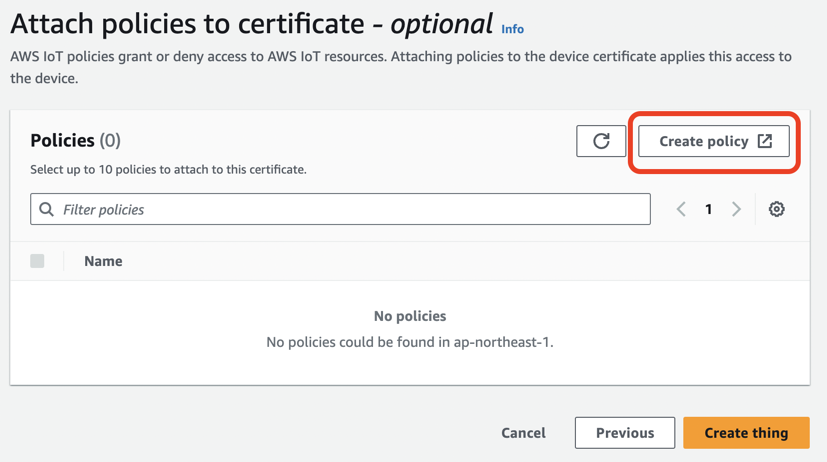
Policy nameに名前(ここではAllActions)を入力して、Policy actionに*を選択し、Policy resourceに*を選択し、Createをクリックします。

☑️ AWS IoT Core での Thing と Certificates と Policy の関係性は以下の図のように、Policyは直接Thingに紐付いている訳ではなく、Certificatesを経由して紐付いています。
+--------------+           +---------------+           +---------------+
|     Thing    | 1----1..* |  Certificate  | 1----0..* |     Policy    |
+--------------+           +---------------+           +---------------+
                             `- アクティブなCertificateは1つだけ
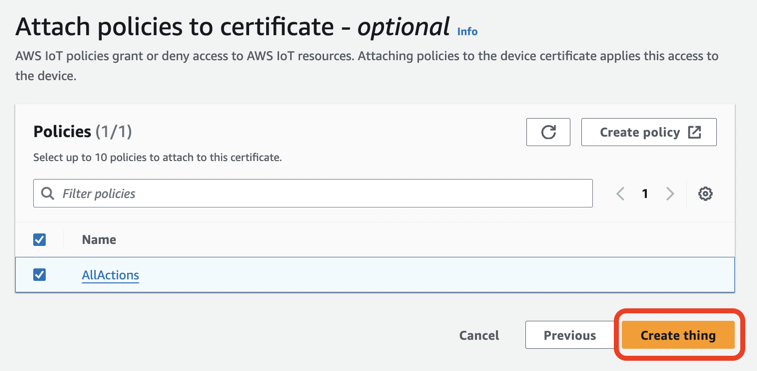
Policiesの画面は閉じてCreate single thingの画面に戻り、作成したポリシーを有効にしてCreate thingをクリックします。
証明書と鍵のダウンロードのためのダイアログが出るので、ファイル全てをダウンロードしてDoneをクリックします。
ダウンロードした証明書や鍵はデバイス側で使うので、Raspberry Piにコピーし、PCからは削除しておきます。
② AWS IoT Device Clientのインストール
AWS IoT Device Client の GitHub リポジトリにREADMEがあるので、そちらの手順に従いインストールしてみます。
まずは、Raspberry Pi の Ubuntu にログインし、必要なパッケージをインストールします。
$ sudo apt install build-essential cmake git libssl-dev
使用するAWS IoT Device Clientのソースはv1.9.2にします。
$ git clone -b v1.9.2 https://github.com/awslabs/aws-iot-device-client
プロジェクトディレクトリ内に移動します。
$ cd aws-iot-device-client
ソースをそのままビルドすると、ワーニングが出る箇所があり、ビルドエラーとして扱わられるようになっているためビルドできないので、対象のワーニングは許容するパッチをあてます。
$ sed -i -e 's/target_compile_options(${DC_PROJECT_NAME} PRIVATE -Wall -Wno-long-long -pedantic -Werror)/target_compile_options(${DC_PROJECT_NAME} PRIVATE -Wall -Wno-long-long -pedantic -Werror -Wno-error=ignored-attributes)/' CMakeLists.txt
ビルドします。
⚠️ 今回の環境では20分程度かかります。
$ bash << BUILD_SCRIPT
#!/usr/bin/env bash
set -e
mkdir build
cd build
cmake ../
cmake --build . --target aws-iot-device-client
BUILD_SCRIPT
次にセットアップのための準備を行います。
セットアップでは以下の情報が必要になります。
- AWS IoT endpoint
- 作成済みの証明書など一式
- 各ファイルのパーミッションはAWS IoT Device Clientの期待にあったパーミッションになっている必要がある
そのため、まず AWS IoT endpoint を以下のAWS CLIを実行して取得します。AWS CLIの認証情報は IoT Coreにアクセスできる認証情報を使用して実行してください。
aws iot describe-endpoint --endpoint-type iot:Data-ATS
証明書など一式はディレクトリに移動し、適したパーミッションに変更をします。
sudo install -m 0700 -d /root/certs
sudo mv ~/*-certificate.pem.crt ~/*-private.pem.key ~/*-public.pem.key ~/AmazonRootCA?.pem /root/certs/
sudo find /root/certs/ -type f -exec chown root:root {} \;
sudo find /root/certs/ -type f -exec chmod 0644 {} \;
sudo find /root/certs/ -type f -name "*-private.pem.key" -exec chmod 0600 {} \;
準備した情報を用いてセットアップを行うために、setup.shを実行します。
$ sudo ./setup.sh
WARNING: Only run this setup script as root if you plan to run the AWS IoT Device Client as root,  or if you plan to run the AWS IoT Device Client as a service. Otherwise, you should run this script as  the user that will execute the client.
Do you want to interactively generate a configuration file for the AWS IoT Device Client? y/n
y
Specify AWS IoT endpoint to use:
あらかじめ取得したAWS IoT endpoint。 e.g. xxxxxxxx-ats.iot.ap-northeast-1.amazonaws.com
Specify path to public PEM certificate:
/root/certs/*.pem.crt
Specify path to private key:
/root/certs/*-private.pem.key
Specify path to ROOT CA certificate:
/root/certs/*.pem
Specify thing name (Also used as Client ID):
UpdateTestPilot
Would you like to configure the logger? y/n
y
Specify desired log level: DEBUG/INFO/WARN/ERROR
INFO
Specify log type: STDOUT for standard output, FILE for file
STDOUT
Specify path to desired log file (if no path is provided, will default to /var/log/aws-iot-device-client/aws-iot-device-client.log:
Creating default log directory...
Would you like to configure the SDK logging? y/n
n
Enable Jobs feature? y/n
y
Specify absolute path to Job handler directory (if no path is provided, will default to /etc/.aws-iot-device-client/jobs):
Enable Secure Tunneling feature? y/n
y
Enable Device Defender feature? y/n
y
Specify an interval for Device Defender in seconds (default is 300):
Enable Fleet Provisioning feature? y/n
n
Enable Pub Sub sample feature? y/n
n
Enable Config Shadow feature? y/n
n
Enable Sample Shadow feature? y/n
n
    {
      "endpoint":   "xxxxxxxx-ats.iot.ap-northeast-1.amazonaws.com",
      "cert":   "/root/certs/*.pem.crt",
      "key":    "/root/certs/*-private.pem.key",
      "root-ca":    "/root/certs/*.pem",
      "thing-name": "UpdateTestPilot",
      "logging":    {
        "level":    "INFO",
        "type": "",
        "file": "/var/log/aws-iot-device-client/aws-iot-device-client.log",
        "enable-sdk-logging":   false,
        "sdk-log-level":    "TRACE",
        "sdk-log-file": "/var/log/aws-iot-device-client/sdk.log"
      },
      "jobs":   {
        "enabled":  true,
        "handler-directory": "/etc/.aws-iot-device-client/jobs"
      },
      "tunneling":  {
        "enabled":  true
      },
      "device-defender":    {
        "enabled":  true,
        "interval": 300
      },
      "fleet-provisioning": {
        "enabled":  false,
        "template-name": "",
        "template-parameters": "",
        "csr-file": "",
        "device-key": ""
      },
      "samples": {
        "pub-sub": {
          "enabled": false,
          "publish-topic": "",
          "publish-file": "/etc/.aws-iot-device-client/pubsub/publish-file.txt",
          "subscribe-topic": "",
          "subscribe-file": "/etc/.aws-iot-device-client/pubsub/subscribe-file.txt"
        }
      },
      "config-shadow":  {
        "enabled":  false
      },
      "sample-shadow": {
        "enabled": false,
        "shadow-name": "",
        "shadow-input-file": "",
        "shadow-output-file": ""
      }
    }
Does the following configuration appear correct? If yes, configuration will be written to /etc/.aws-iot-device-client/aws-iot-device-client.conf: y/n
y
Configuration has been successfully written to /etc/.aws-iot-device-client/aws-iot-device-client.conf
Creating default pubsub directory...
Do you want to copy the sample job handlers to the specified handler directory (/etc/.aws-iot-device-client/jobs)? y/n
y
Do you want to install AWS IoT Device Client as a service? y/n
y
Enter the complete directory path for the aws-iot-device-client. (Empty for default: ./build/aws-iot-device-client)
Enter the complete directory path for the aws-iot-device-client service file. (Empty for default: ./setup/aws-iot-device-client.service)
Do you want to run the AWS IoT Device Client service via Valgrind for debugging? y/n
n
Installing AWS IoT Device Client...
/usr/bin/systemctl
Created symlink /etc/systemd/system/multi-user.target.wants/aws-iot-device-client.service → /etc/systemd/system/aws-iot-device-client.service.
● aws-iot-device-client.service - AWS IoT Device Client
     Loaded: loaded (/etc/systemd/system/aws-iot-device-client.service; enabled; preset: enabled)
     Active: active (running) since Sat 2024-06-22 06:34:09 UTC; 69ms ago
   Main PID: 41844 (aws-iot-device-)
      Tasks: 1 (limit: 3864)
     Memory: 844.0K (peak: 1.5M)
        CPU: 38ms
     CGroup: /system.slice/aws-iot-device-client.service
             └─41844 /sbin/aws-iot-device-client --config-file /etc/.aws-iot-device-client/aws-iot-device-client.conf
Jun 22 06:34:09 mptcp-proxy systemd[1]: Started aws-iot-device-client.service - AWS IoT Device Client.
q
AWS IoT Device Client is now running! Check /var/log/aws-iot-device-client/aws-iot-device-client.log for log output.
付録:Mender編
ステップ1: Hosted Menderアカウントの作成と mender-client のインストール
① hosted Mender accountの作成
アカウントがない場合はhosted Menderにサインアップします。
② Mender Clientのインストール
こちらの手順に従ってインストールの準備をします。
$ sudo apt-get update
$ sudo apt-get install --assume-yes \
        apt-transport-https \
        ca-certificates \
        curl \
        gnupg-agent \
        software-properties-common
$ curl -fsSL https://downloads.mender.io/repos/debian/gpg | sudo tee /etc/apt/trusted.gpg.d/mender.asc
$ gpg --show-keys --with-fingerprint /etc/apt/trusted.gpg.d/mender.asc
$ echo "deb [arch=$(dpkg --print-architecture)] https://downloads.mender.io/repos/debian ubuntu/jammy/stable main" \
 | sudo tee /etc/apt/sources.list.d/mender.list > /dev/null
$ sudo apt-get update
インストーラーを起動
$ sudo apt-get install mender-client4
インストーラーを起動するとコンソールに以下のように、hosted Menderに接続するための情報を訪ねられるので、入力していきます。
Mender Client Setup
===================
Setting up the Mender client: The client will regularly poll the server to check for updates and report its inventory data.
Get started by first configuring the device type and settings for communicating with the server.
The device type property is used to determine which Mender Artifact are compatible with this device.
Enter a name for the device type (e.g. raspberrypi3): [update-test-pilot] raspberrypi4
Are you connecting this device to hosted.mender.io? [Y/n] Y
Enter your credentials for hosted.mender.io
Email: あらかじめMenderサーバーに登録しておいたEメール
Password: あらかじめMenderサーバーに登録しておいたパスワード
Demo intervals uses short poll and retry intervals (Recommended for testing.)
Do you want to run the client in demo mode? [Y/n] Y
Mender setup successfully.
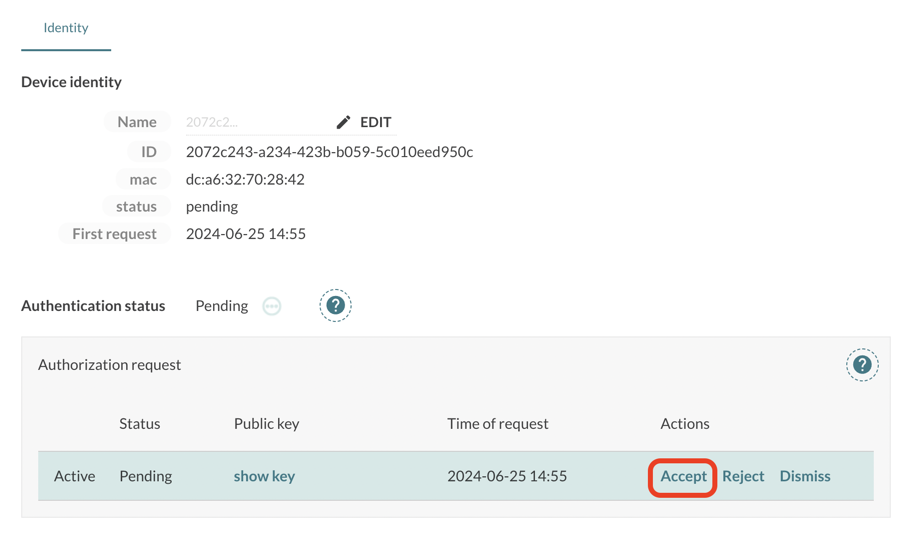
③ hosted Menderでの認証
Menderでの認証方法にはさまざまな方法がありますが、ここではAuthorize-on-request Flowで認証します。
hosted Menderにログインし、DEVICES > All devicesをクリックし、Status: pendingで認証待ちのデバイスをフィルターします。対象のデバイスのMACアドレスが表示されているのでこのデバイスをクリックします。
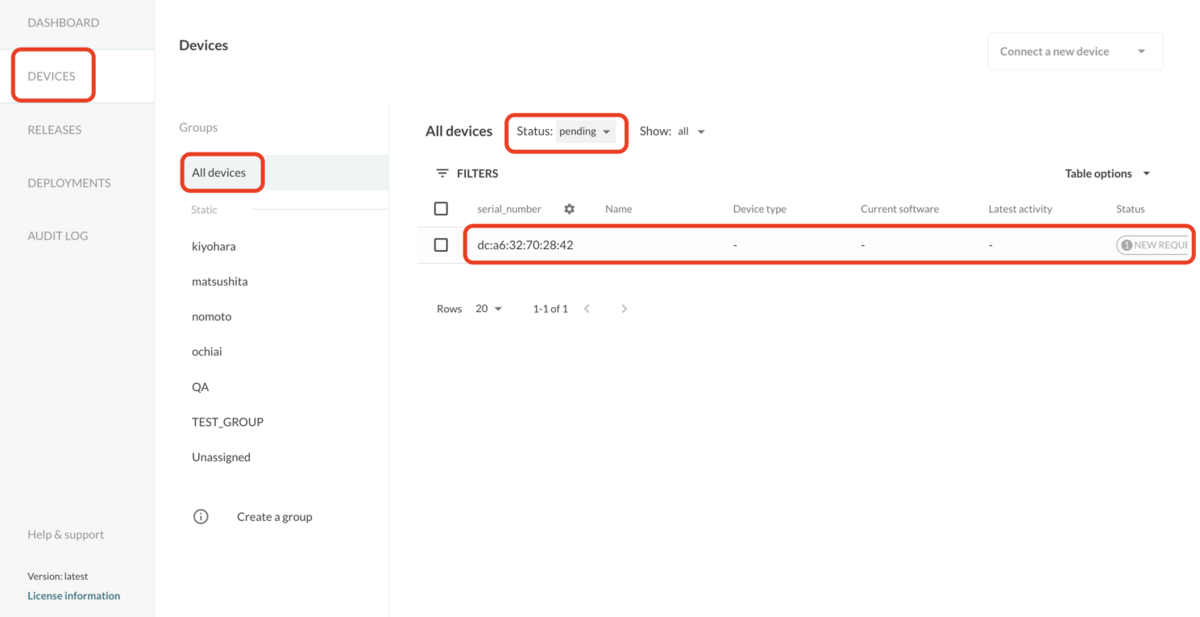
Acceptをクリックして認証します。